
Attendance Tracking
Attendance can be logged individually or by number present. An example of individual attendance is: Bod and Sally were here but Jane was not. An example of attendance by number present is: four people were here and 1 was not. You choose how attendance will be collect by meeting.
You can collect attendance two different ways.
Using the RFID Card Reader and Application
- Make sure you have installed the reader software & drivers.
- On the right sidebar menu, click the “Launch Attendance Reader” button. This will download and launch the client application that connects to the RFID reader.
- Connect the RFID Reader to your computer. The client application should now say “Reader Connected”.
- Choose the meetings for which you wish to collect attendance from the drop down (Screenshot). Click the “Set Meeting” button. You can take attendance for multiple meetings at once. Repeat this step for all meeting you wish to collect attendance for.
- If you make a mistake, you can click the “Clear Meetings” button and re-enter your meetings.
- Once you have set your meeting(s), choose “Lock in Session” from the “File” menu; this will prevent someone from accidentally clearing or adding meetings. This can also be accomplished by the key combination CTRL + l.
- You can unlock the session by choosing “Unlock Session” from the “File” menu, or by pressing CTRL + u.
- You are ready to take attendance! People only have to wave their cards over the reader in order to be logged as present. Their name will be displayed as a confirmation. On the Macintosh operating system, the name will also be spoken; this can be disabled from the “File” menu.
Manual Entry Online
- Navigate to the “Utilities” section of the online SimpleChurch CRM application.
- Choose “Add Session”.
- Choose the meeting for which you are entering attendance – you should see a table of members belonging to that session appear, if the meeting type is “individual”; otherwise a box labeled “Number Present” will appear.
- Choose the date for the session by clicking in the date box and selecting the day from the popup calendar.
- Enter the number present, or go through the list of people in the meeting; check the radio button in the column corresponding to each person’s presence or absence. If a person is absent but accounted for – you know where they are, they aren’t “missing” – choose the radio button in the unexcused column, and choose the reason for the absence from the drop down.
- Click “Save”.
Handling Visitors
- There are 2 types of visitors that can be added to a session: 1. Those that are already stored in SimpleChurch CRM as and 2. those that are not. Anyone stored in SimpleChurch CRM can be added to any session as a visitor. If someone is not stored as an individual in SimpleChurch CRM, he/she can be added as a visitor and later converted to a regular individual.
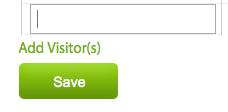
- To add a visitor to a session, Click “Add Visitor”.
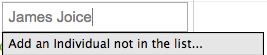
- Then, search for the visitor by using part/all of their first and/or last name(s). If there is no match, click “Add an individual not in the list”.
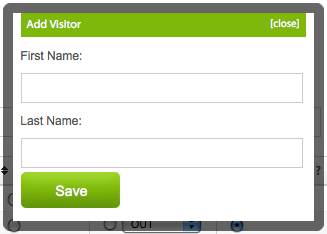
- Enter their first and last names into the popup and click, “Save”. The visitor has been added to the session, and he/she will now be able to be chosen in future sessions. Their name with have “(Visitor)” next to it wherever it appears.
- You can now add additional visitors. Individuals that have been added to the system who are not visitors will not have “(Visitor)” next to their names.
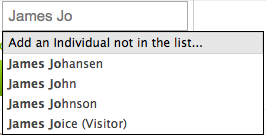
Note the presence of regular individuals and a visitor.